View Components Guide
Cycle View
The cycleview component allows developers to display a single item from a
list. When the user taps the item, the current item slides upwards and is
replaced with the next item from the list. When the end of the list is reached,
the first item is displayed, starting the loop again.
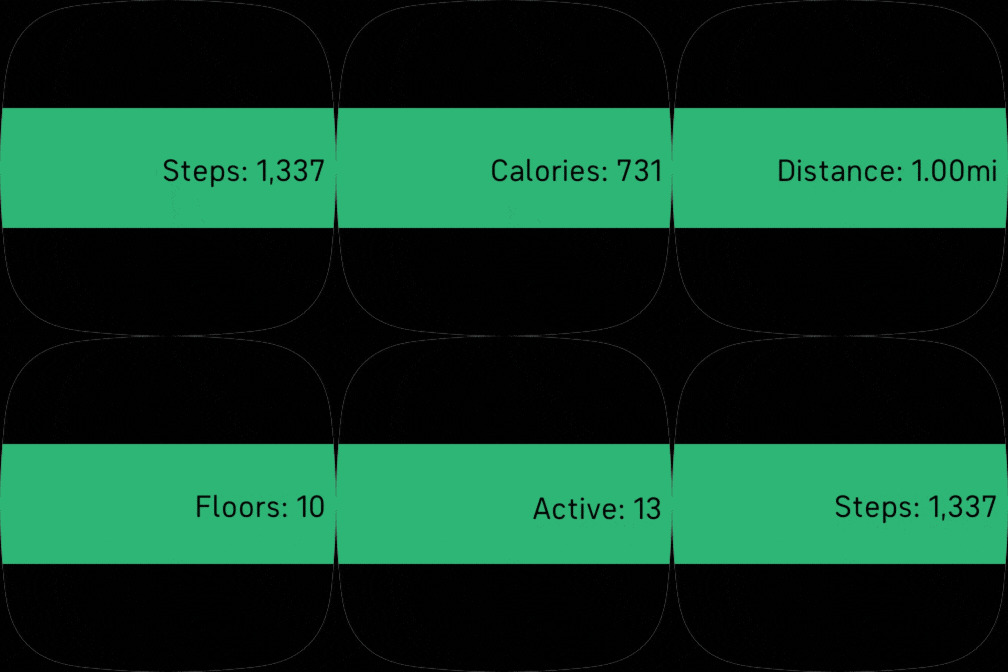
First you need to declare a cycleview element as a container. By default it
will have a height and width of 100%.
Then you must declare one or more cycleview-item elements, which will
contain the actual content you wish to cycle.
Imports
In addition to any existing imports, you must include the following imports
within your widget.defs file:
<svg>
  <defs>
    <link rel="stylesheet" href="styles.css" />
    <link rel="import" href="/mnt/sysassets/system_widget.defs" />
    <!-- Additional Imports -->
    <link rel="import" href="/mnt/sysassets/widgets/baseview_widget.defs" />
    <link rel="import" href="/mnt/sysassets/widgets/cycleview_widget.defs" />
  </defs>
</svg>
Usage
The following example will display 5 different statistics which will be displayed in one at a time, tap the item to cycle to the next statistic.
We use the #container element to control the size and position of our
cycleview, and a <rect> to provide an alternative background color.
Include the following SVG in your index.view file:
<svg>
  <svg id="container">
    <rect id="background" class="application-fill" />
    <use id="statsCyle" href="#cycleview">
      <use href="#cycleview-item" class="cycle-item">
        <text>Steps: 1,337</text>
      </use>
      <use href="#cycleview-item" class="cycle-item">
        <text>Calories: 731</text>
      </use>
      <use href="#cycleview-item" class="cycle-item">
        <text>Distance: 1.00mi</text>
      </use>
      <use href="#cycleview-item" class="cycle-item">
        <text>Floors: 10</text>
      </use>
      <use href="#cycleview-item" class="cycle-item">
        <text>Active: 13</text>
      </use>
    </use>
  </svg>
</svg>
Include the following CSS in your styles.css file:
.application-fill           { fill: fb-green; }
.foreground-fill            { fill: fb-white; }
.background-fill            { fill: fb-black; }

#container {
  width: 100%;
  height: 120;
  x: 0;
  y: 50%-60;
}

#background {
  width: 100%;
  height: 100%;
}

.cycle-item text {
  font-size: 32;
  x: 100%-10;
  text-anchor: end;
  fill: black;
}
Use the following JavaScript in your index.js file to interact with the
cycle view and its items:
import * as document from "document";

// Get a handle on the cycleview
const statsCyle = document.getElementById("statsCyle");

// Get an array of cycle-items
const items = statsCyle.getElementsByClassName("cycle-item");

// How many items
console.log(items.length);

// Select a specific item by index
statsCyle.value = 3;

// Get the current selected item index
console.log(statsCyle.value);

// Hide a specific item by index
items[2].style.display = "none";
Scroll View
The scrollview component allows developers to create an application which is
taller than the screen dimensions. The user can easily scroll the entire view
vertically with their finger, and a scrollbar automatically appears on the
right side of the screen.

First you need to declare a scrollview element as a container. By default it
will have a height and width of 100%.
Then you must declare one or more scrollview-item elements, which will contain
the actual content you wish to scroll. Each item has a height property, which
by default will be 100% of the scrollview container element height.
Imports
In addition to any existing imports, you must include the following imports
within your widget.defs file:
<svg>
  <defs>
    <link rel="stylesheet" href="styles.css" />
    <link rel="import" href="/mnt/sysassets/system_widget.defs" />
    <!-- Additional Imports -->
    <link rel="import" href="/mnt/sysassets/widgets/baseview_widget.defs" />
    <link rel="import" href="/mnt/sysassets/widgets/scrollview_widget.defs" />
  </defs>
</svg>
Usage
The following example will display 3 stacked <rect> tags which will be
displayed in a list that can be scrolled vertically.
Include the following SVG in your index.view file:
<svg>
  <use href="#scrollview">
    <use href="#scrollview-item" height="200">
      <rect width="100%" height="100%" fill="fb-cyan" />
    </use>
    <use href="#scrollview-item" height="200">
      <rect width="100%" height="100%" fill="fb-red" />
    </use>
    <use href="#scrollview-item" height="200">
      <rect width="100%" height="100%" fill="fb-green" />
    </use>
  </use>
</svg>
Flexible Item Height
If you don't want a fixed height for each scrollview-item, you can use the
flexible-height value on the display attribute, and the item height will be
calculated dynamically.
<svg>
  <use href="#scrollview">
    <use href="#scrollview-item" display="flexible-height">
      <rect width="100%" height="100" fill="fb-cyan" />
    </use>
    <use href="#scrollview-item" display="flexible-height">
      <rect width="100%" height="200" fill="fb-red" />
    </use>
    <use href="#scrollview-item" display="flexible-height">
      <rect width="100%" height="300" fill="fb-green" />
    </use>
  </use>
</svg>
Section Headers
You can also create multiple section of items, with a header that snaps to the top of the screen. When all of the items for a section have been scrolled, the next header snaps to the top of the screen.
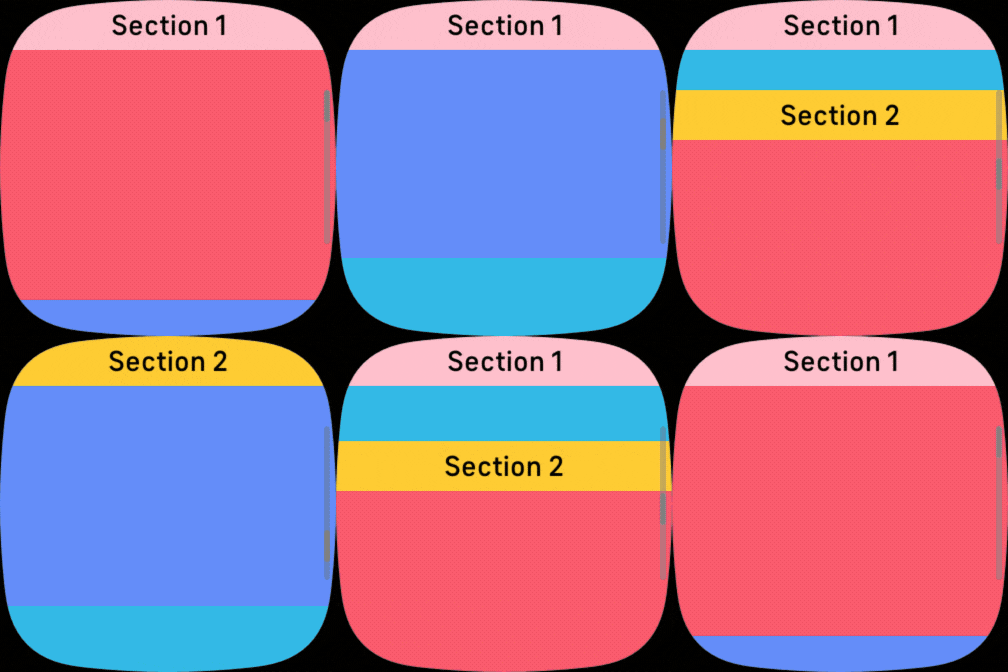
This example uses a reusable template symbol. If you're unfamiliar with them, we recommend taking a look at the Template Symbol section of the SVG guide.
widget.defs
<svg>
  <defs>
    <link rel="stylesheet" href="styles.css" />
    <link rel="import" href="/mnt/sysassets/system_widget.defs" />

    <link rel="import" href="/mnt/sysassets/widgets/baseview_widget.defs" />
    <link rel="import" href="/mnt/sysassets/widgets/scrollview_widget.defs" />

    <symbol id="view-header" href="#scrollview-header">
      <rect fill="inherit" x="0" y="0" width="100%" height="100%"/>
      <text id="text" x="50%" y="50%+10" fill="black" font-size="30"
        font-weight="bold" text-anchor="middle" />
    </symbol>
  </defs>
</svg>
index.view
<svg>
  <use href="#scrollview">
    <!-- Section 1 -->
    <use href="#view-header" height="50" fill="pink">
      <set href="#text" attributeName="text-buffer" to="Section 1" />
    </use>
    <use href="#scrollview-item" height="250">
      <rect width="100%" height="100%" fill="fb-red" />
    </use>
    <use href="#scrollview-item" height="250">
      <rect width="100%" height="100%" fill="fb-blue" />
    </use>
    <use href="#scrollview-item" height="250">
      <rect width="100%" height="100%" fill="fb-cyan" />
    </use>
      <!-- Section 2 -->
    <use href="#view-header" height="50" fill="fb-peach">
      <set href="#text" attributeName="text-buffer" to="Section 2" />
    </use>
    <use href="#scrollview-item" height="250">
      <rect width="100%" height="100%" fill="fb-red" />
    </use>
    <use href="#scrollview-item" height="250">
      <rect width="100%" height="100%" fill="fb-blue" />
    </use>
    <use href="#scrollview-item" height="250">
      <rect width="100%" height="100%" fill="fb-cyan" />
    </use>
  </use>
</svg>
Configuration
The component is composed of the following SVG sub elements:
#scrollview-header: A container element for a section heading.#scrollview-item: A repeating container element within the scrollview.
Tile List
The tile-list component allows developers to create an application which
provides users the ability to vertically scroll a list of tile-list-item
elements.
Although similar to the Scroll View, there are some subtle differences, for example:
The height of a Tile Item should not exceed the height of the screen.
Tile Items can be dynamically reordered using drag and drop.
When scrolling, the Tile List can automatically snap to the top of the closest Tile Item.
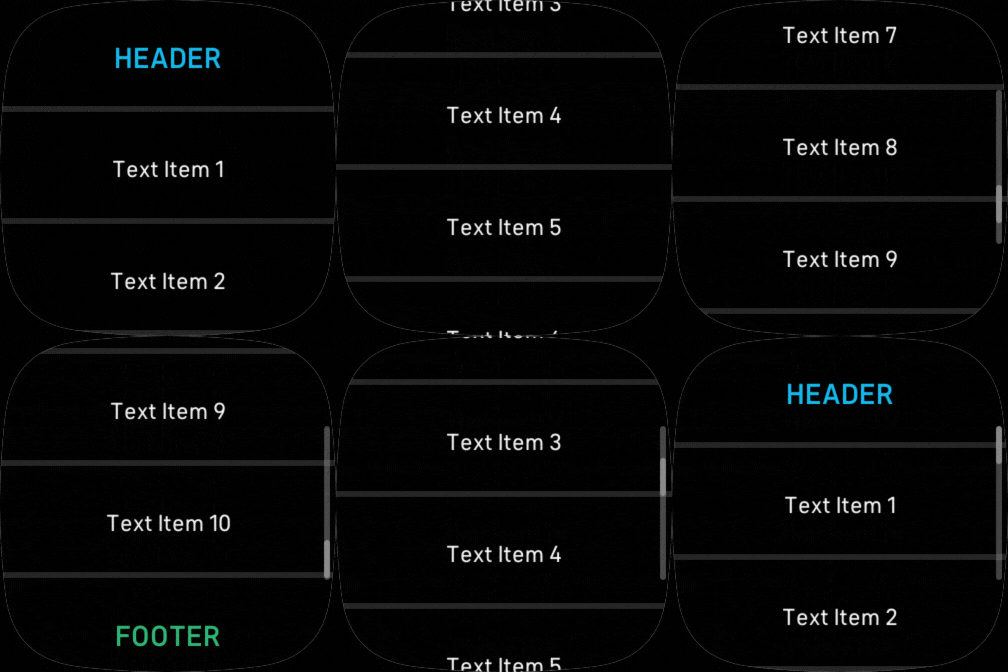
First you need to declare a tile-list element as a container. By default it
will have a height and width of 100%.
Then you must declare one or more tile-list-item elements, which will contain
the actual content you wish to scroll. Each item is 100% height. You can mix
different elements inside a tile element.
You can also have a header by using the tile-list-header element. Headers
behave the same way as a tile-list-item, except that a header cannot be
selected for reorder, and a reordered item cannot be dragged over a header. A
list can have any number of header tiles.
Last, but not least, you can add a footer using the tile-list-footer element.
If a list has a footer, there may only be one, and it must be the last entry in
the list. A footer tile cannot be selected for reorder, and a reordered item
cannot be dragged over the footer. If the user drags the list upwards, the
footer tile will always stick to the bottom of the view.
The cleanest way to build the list is by defining your own
Template Symbols for the
tile-list-header, tile-list-item, and tile-list-footer elements.
Imports
In addition to any existing imports, you must include the following imports, and
definitions for your tile-list-header, tile-list-item, and
tile-list-footer, within your widget.defs file:
<svg>
  <defs>
    <link rel="stylesheet" href="styles.css" />
    <link rel="import" href="/mnt/sysassets/system_widget.defs" />

    <link rel="import" href="/mnt/sysassets/widgets/baseview_widget.defs" />
    <link rel="import" href="/mnt/sysassets/widgets/scrollbar.defs" />
    <link rel="import" href="/mnt/sysassets/widgets/tile_list_widget.defs" />

    <symbol id="my-header" href="#tile-list-header" class="list-item  header">
      <text id="text" />
      <rect class="line" />
    </symbol>

    <symbol id="my-item" href="#tile-list-item" class="list-item">
      <text id="text" />
      <rect class="line" />
    </symbol>

    <symbol id="my-footer" href="#tile-list-footer" class="list-item footer">
      <text id="text" />
    </symbol>
  </defs>
</svg>
Note: Note that the scrollbar is also imported and automatically displays the scroll progress to the user.
Usage
Here is an example with a list of text items with a header and a footer:

<svg>
  <use id="myList" href="#tile-list" class="horizontal-pad">
    <use href="#my-header">
      <set href="#text" attributeName="text-buffer" to="HEADER" />
    </use>
    <use href="#my-item">
      <set href="#text" attributeName="text-buffer" to="Text Item 1" />
    </use>
    <use href="#my-item">
      <set href="#text" attributeName="text-buffer" to="Text Item 2" />
    </use>
    <use href="#my-item">
      <set href="#text" attributeName="text-buffer" to="Text Item 3" />
    </use>
    <use href="#my-item">
      <set href="#text" attributeName="text-buffer" to="Text Item 4" />
    </use>
    <use href="#my-item">
      <set href="#text" attributeName="text-buffer" to="Text Item 5" />
    </use>
    <use href="#my-item">
      <set href="#text" attributeName="text-buffer" to="Text Item 6" />
    </use>
    <use href="#my-item">
      <set href="#text" attributeName="text-buffer" to="Text Item 7" />
    </use>
    <use href="#my-item">
      <set href="#text" attributeName="text-buffer" to="Text Item 8" />
    </use>
    <use href="#my-item">
      <set href="#text" attributeName="text-buffer" to="Text Item 9" />
    </use>
    <use href="#my-item">
      <set href="#text" attributeName="text-buffer" to="Text Item 10" />
    </use>
    <use href="#my-footer">
      <set href="#text" attributeName="text-buffer" to="FOOTER" />
    </use>
  </use>
</svg>
Then include some basic styling within your styles.css file:
.list-item {
  height: 112;
}

.list-item text {
  fill: "white";
  x: 50%;
  text-anchor: middle;
  font-size: 24;
}

.line {
  height: 6;
  width: 100%;
  fill: #222222;
  y: 100%-6;
}

.header text {
  font-weight: bold;
  fill: fb-cyan;
  font-size: 30;
}

.footer text {
  font-weight: bold;
  fill: fb-green;
  font-size: 30;
}
Configuration
There are a number of additional settings which affect the behavior of the tile list.
Reorder
The reorder-enabled setting allow the user to drag and drop items to affect
their sort order. The possible values are 0 for disabled, and 1 for enabled
which is the default configuration.
Each child tile-list-item must have a unique ID for reordering to be
automatically persisted.
<svg>
  <use id="myList" href="#tile-list">
    <var id="reorder-enabled" value="1" />
    <use id="item1" href="#my-item">
      <set href="#text" attributeName="text-buffer" to="Text Item 1" />
    </use>
    <use id="item2" href="#my-item">
      <set href="#text" attributeName="text-buffer" to="Text Item 2" />
    </use>
    <!-- etc... -->
  </use>
</svg>
Peek Mode
By default the list will have peek functionality enabled: clicking on a tile
that is partially off the view will cause the tile to align to the edge of the
view without the click interacting with elements inside the tile. The peek
functionality can be specifically disabled by including the peek-enabled
setting with the value 0. When peek is disabled, clicks on a partially visible
tile will interact with the tile content the same way it would when the tile is
fully on the view, and the view will not automatically scroll to align to the
tile.
<!-- disable peek mode -->
<svg>
  <use id="myList" href="#tile-list">
    <var id="peek-enabled" value="0" />
    <use id="item1" href="#my-item">
      <set href="#text" attributeName="text-buffer" to="Text Item 1" />
    </use>
    <use id="item2" href="#my-item">
      <set href="#text" attributeName="text-buffer" to="Text Item 2" />
    </use>
    <!-- etc... -->
  </use>
</svg>
Alignment
The align-mode setting can take 0 for no alignment and 1 for alignment to
the nearest item to the top of the view. It's disabled by default.
By default the list allows the scroll to end on any position within the list.
The alignment mode can be selected explicitly by including the align-mode
setting. The possible values are 1 which make selects aligning to the nearest
item to the top of the view after the scroll ends and 0 which result in no
alignment which is the default behavior.
<svg>
  <use id="myList" href="#tile-list">
    <var id="align-mode" value="1" />
    <use id="item1" href="#my-item">
      <set href="#text" attributeName="text-buffer" to="Text Item 1" />
    </use>
    <use id="item2" href="#my-item">
      <set href="#text" attributeName="text-buffer" to="Text Item 2" />
    </use>
    <!-- etc... -->
  </use>
</svg>
Advanced Usage
The Tile List is a incredibly powerful component. In this next example we are
going to create a custom tile-list-item with a horizontal separator, and a
touch click event for each item.
This example configuration could be used as an application menu interface.
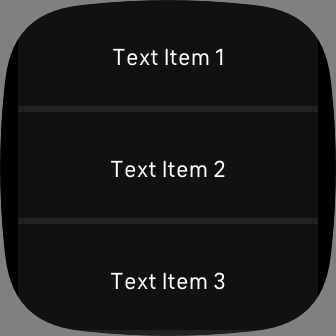
Import the required components and define an tile-list-item template which
contains an element that can receive the click event in your widget.defs:
<svg>
  <defs>
    <link rel="stylesheet" href="styles.css" />
    <link rel="import" href="/mnt/sysassets/system_widget.defs" />

    <link rel="import" href="/mnt/sysassets/widgets/baseview_widget.defs" />
    <link rel="import" href="/mnt/sysassets/widgets/scrollbar.defs" />
    <link rel="import" href="/mnt/sysassets/widgets/tile_list_widget.defs" />

    <symbol id="my-item" href="#tile-list-item" class="list-item">
      <rect class="bg" />
      <text id="text" />
      <rect class="line" />
      <rect id="touch" pointer-events="all" />
    </symbol>

  </defs>
</svg>
Include the following SVG in your index.view file:
<svg>
  <use id="myList" href="#tile-list" class="horizontal-pad">
    <var id="separator-height-bottom" value="6" />
    <use id="item1" href="#my-item">
      <set href="#text" attributeName="text-buffer" to="Text Item 1" />
    </use>
    <use id="item2" href="#my-item">
      <set href="#text" attributeName="text-buffer" to="Text Item 2" />
    </use>
    <use id="item3" href="#my-item">
      <set href="#text" attributeName="text-buffer" to="Text Item 3" />
    </use>
    <use id="item4" href="#my-item">
      <set href="#text" attributeName="text-buffer" to="Text Item 4" />
    </use>
    <use id="item5" href="#my-item">
      <set href="#text" attributeName="text-buffer" to="Text Item 5" />
    </use>
    <use id="item6" href="#my-item">
      <set href="#text" attributeName="text-buffer" to="Text Item 6" />
    </use>
    <use id="item7" href="#my-item">
      <set href="#text" attributeName="text-buffer" to="Text Item 7" />
    </use>
    <use id="item8" href="#my-item">
      <set href="#text" attributeName="text-buffer" to="Text Item 8" />
    </use>
    <use id="item9" href="#my-item">
      <set href="#text" attributeName="text-buffer" to="Text Item 9" />
    </use>
    <use id="item10" href="#my-item">
      <set href="#text" attributeName="text-buffer" to="Text Item 10" />
    </use>
  </use>
</svg>
Include the following CSS in your styles.css file:
.list-item {
  height: 112;
}

.list-item text {
  fill: "white";
  text-anchor: middle;
  x: 50%;
  font-size: 24;
  text-length: 20;
}

.line {
  width: 100%;
  height: 6;
  fill: #222222;
  y: 100%-6;
}

.bg {
  fill: #111111;
  width: 100%;
  height: 100%;
  x: 0;
  y: 0;
}

#touch {
  width: 100%;
  height: 100%-6;
  x: 0;
  y: 0;
  opacity: 0;
}
Use the following JavaScript in your index.js file to handle the click
event for each item:
import * as document from "document";

let list = document.getElementById("myList");
let items = list.getElementsByClassName("list-item");

items.forEach((element, index) => {
  let touch = element.getElementById("touch");
  touch.onclick = function(evt) {
    console.log(`touched: ${index}`);
  };
});
You can use the value property to get and set the selected zero-based index of
the tile-list in JavaScript.
import * as document from "document";

let list = document.getElementById("my-list");

// Get the selected index
let currentIndex = list.value;

// Set the selected index
list.value = 3; // Scroll to the 4th item
Virtual Tile List
The virtual configuration of the tile-list has the advantage of being
dynamically generated. Instead of using a hard-coded list of tile-items it
allocates them from a pool as they are rendered. This allows for a very large
list of items to be displayed, while it's actually just cycling through a small
number of items from the pool.
Let's recreate the advanced example above, but this time displaying 100 items.
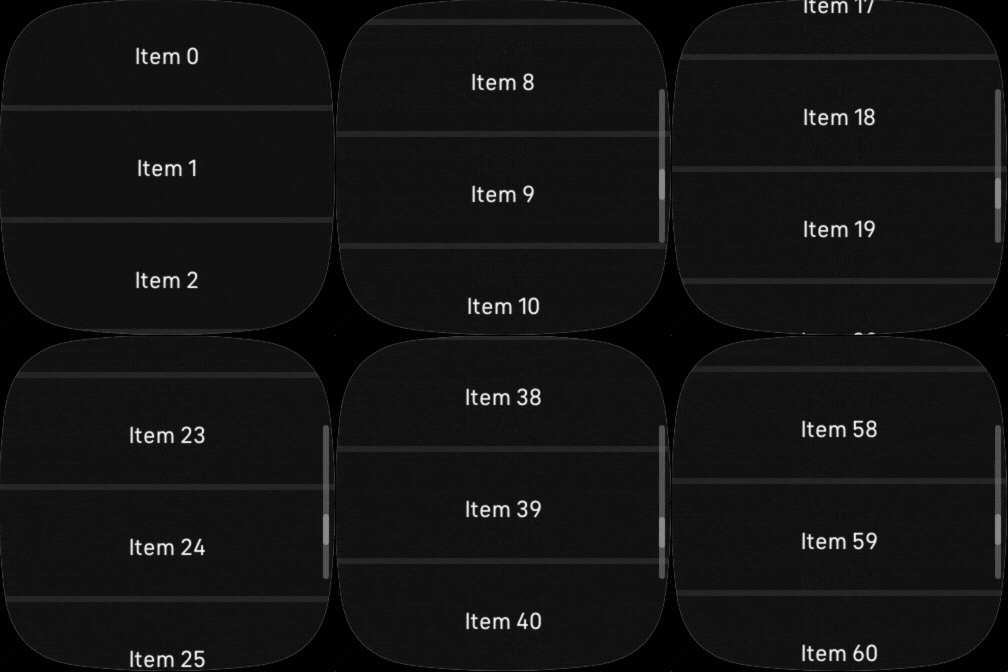
To setup this configuration, we first define our tile-list-item template, the
tile-list itself, we enable virtual mode to 1, and define a
tile-list-pool. Our pool must contain enough items to fill the screen, with a
few extra to help with smooth scrolling.
The
tile-list-itemmust be hiddendisplay="none"by default.
Import the required components and define an tile-list-item template which
contains an element that can receive the click event in your widget.defs:
<svg>
  <defs>
    <link rel="stylesheet" href="styles.css" />
    <link rel="import" href="/mnt/sysassets/system_widget.defs" />

    <link rel="import" href="/mnt/sysassets/widgets/baseview_widget.defs" />
    <link rel="import" href="/mnt/sysassets/widgets/scrollbar.defs" />
    <link rel="import" href="/mnt/sysassets/widgets/tile_list_widget.defs" />

    <symbol id="my-item" href="#tile-list-item" class="list-item" display="none">
      <rect class="bg" />
      <text id="text" />
      <rect class="line" />
      <rect id="touch" pointer-events="all" />
    </symbol>

  </defs>
</svg>
Include the following SVG in your index.view file:
<svg>
  <use id="myList" href="#tile-list">
    <var id="virtual" value="1" />
    <var id="reorder-enabled" value="0"/>
    <var id="peek-enabled" value="0"/>
    <var id="separator-height-bottom" value="2" />

    <use id="my-pool" href="#tile-list-pool">
      <use id="my-pool[0]" href="#my-item" />
      <use id="my-pool[1]" href="#my-item" />
      <use id="my-pool[2]" href="#my-item" />
      <use id="my-pool[3]" href="#my-item" />
      <use id="my-pool[4]" href="#my-item" />
      <use id="my-pool[5]" href="#my-item" />
      <use id="my-pool[6]" href="#my-item" />
      <use id="my-pool[7]" href="#my-item" />
      <use id="my-pool[8]" href="#my-item" />
      <use id="my-pool[9]" href="#my-item" />
      <use id="my-pool[10]" href="#my-item" />
      <use id="my-pool[11]" href="#my-item" />
      <use id="my-pool[12]" href="#my-item" />
      <use id="my-pool[13]" href="#my-item" />
      <use id="my-pool[14]" href="#my-item" />
    </use>
  </use>
</svg>
Use the following JavaScript in your index.js file to dynamically create
100 items, and handle the click event for each item.
The delegate is responsible for rendering each tile-list-item as it's
required. It contains 2 functions:
getTileInfo()- Gets the content of each tile by itsindex.configureTile()- Configures atile-list-itembefore it is displayed.
import * as document from "document";

let myList = document.getElementById("myList");

let NUM_ELEMS = 100;

myList.delegate = {
  getTileInfo: (index) => {
    return {
      type: "my-pool",
      value: "Item",
      index: index
    };
  },
  configureTile: (tile, info) => {
    console.log(`Item: ${info.index}`)
    if (info.type == "my-pool") {
      tile.getElementById("text").text = `${info.value} ${info.index}`;
      let touch = tile.getElementById("touch");
      touch.onclick = function(evt) {
        console.log(`touched: ${info.index}`);
      };
    }
  }
};

// length must be set AFTER delegate
myList.length = NUM_ELEMS;
Warning: Do not use the VirtualTileListItem methods
.align,.show, or.hidewithin theconfigureTile()function, it will cause your application to crash.
Tumbler View
The tumblerview component allows elements to be scrolled upwards or downwards
vertically, like a combination lock tumbler. The scrolling is cyclical, never
ending in either direction, with the system automatically picking the next
available item from the list..
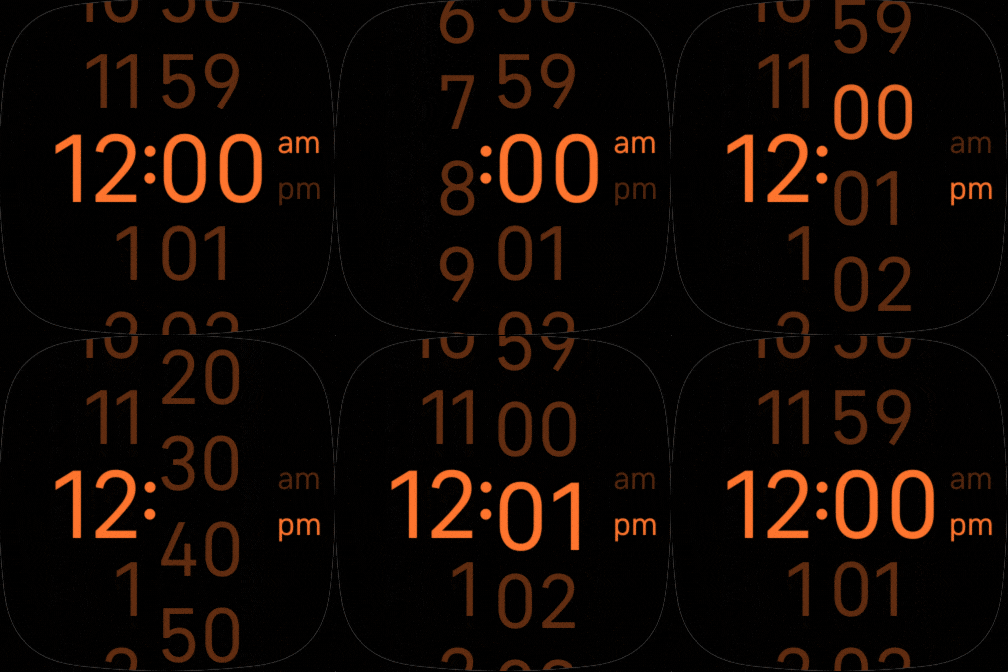
First you need to declare a tumblerview element as a container. By default it
will have a height and width of 100%.
Then you must declare one or more tumbler-item elements, which should contain
a <text> element.
Imports
In addition to any existing imports, you must include the following imports
within your widget.defs file:
<svg>
  <defs>
    <link rel="stylesheet" href="styles.css" />
    <link rel="import" href="/mnt/sysassets/system_widget.defs" />
    <!-- Additional Imports -->
    <link rel="import" href="/mnt/sysassets/widgets/baseview_widget.defs" />
    <link rel="import" href="/mnt/sysassets/widgets/tumblerview_widget.defs" />
  </defs>
</svg>
Usage
The following example will display two individual tumblers side by side, allowing a user to select hours and minutes, similar to the Fitbit Alarms app.
An AM/PM indicator will be automatically updated based upon the selected hour.
Note: For the sake of brevity, some items in the minutes tumbler have been removed.
Include the following SVG in your index.view file:
<svg class="application-fill">
  <use id="tumbler-hour" href="#tumblerview">
    <use id="hour-item0" href="#tumbler-item">
      <set href="value/text" attributeName="text-buffer" to="12" />
    </use>
    <use id="hour-item1" href="#tumbler-item">
      <set href="value/text" attributeName="text-buffer" to="1" />
    </use>
    <use id="hour-item2" href="#tumbler-item">
      <set href="value/text" attributeName="text-buffer" to="2" />
    </use>
    <use id="hour-item3" href="#tumbler-item">
      <set href="value/text" attributeName="text-buffer" to="3" />
    </use>
    <use id="hour-item4" href="#tumbler-item">
      <set href="value/text" attributeName="text-buffer" to="4" />
    </use>
    <use id="hour-item5" href="#tumbler-item">
      <set href="value/text" attributeName="text-buffer" to="5" />
    </use>
    <use id="hour-item6" href="#tumbler-item">
      <set href="value/text" attributeName="text-buffer" to="6" />
    </use>
    <use id="hour-item7" href="#tumbler-item">
      <set href="value/text" attributeName="text-buffer" to="7" />
    </use>
    <use id="hour-item8" href="#tumbler-item">
      <set href="value/text" attributeName="text-buffer" to="8" />
    </use>
    <use id="hour-item9" href="#tumbler-item">
      <set href="value/text" attributeName="text-buffer" to="9" />
    </use>
    <use id="hour-item10" href="#tumbler-item">
      <set href="value/text" attributeName="text-buffer" to="10" />
    </use>
    <use id="hour-item11" href="#tumbler-item">
      <set href="value/text" attributeName="text-buffer" to="11" />
    </use>
    <use id="hour-item12" href="#tumbler-item">
      <set href="value/text" attributeName="text-buffer" to="12" />
    </use>

    <use id="hour-item13" href="#tumbler-item">
      <set href="value/text" attributeName="text-buffer" to="1" />
    </use>
    <use id="hour-item14" href="#tumbler-item">
      <set href="value/text" attributeName="text-buffer" to="2" />
    </use>
    <use id="hour-item15" href="#tumbler-item">
      <set href="value/text" attributeName="text-buffer" to="3" />
    </use>
    <use id="hour-item16" href="#tumbler-item">
      <set href="value/text" attributeName="text-buffer" to="4" />
    </use>
    <use id="hour-item17" href="#tumbler-item">
      <set href="value/text" attributeName="text-buffer" to="5" />
    </use>
    <use id="hour-item18" href="#tumbler-item">
      <set href="value/text" attributeName="text-buffer" to="6" />
    </use>
    <use id="hour-item19" href="#tumbler-item">
      <set href="value/text" attributeName="text-buffer" to="7" />
    </use>
    <use id="hour-item20" href="#tumbler-item">
      <set href="value/text" attributeName="text-buffer" to="8" />
    </use>
    <use id="hour-item21" href="#tumbler-item">
      <set href="value/text" attributeName="text-buffer" to="9" />
    </use>
    <use id="hour-item22" href="#tumbler-item">
      <set href="value/text" attributeName="text-buffer" to="10" />
    </use>
    <use id="hour-item23" href="#tumbler-item">
      <set href="value/text" attributeName="text-buffer" to="11" />
    </use>
  </use>

  <use id="settings-colon-container" href="#static-text" class="tumbler-colon h1">
    <set href="#text" attributeName="text-buffer" to=":"/>
  </use>

  <use id="tumbler-mins" href="#tumblerview">
    <use id="min-item0" href="#tumbler-item">
      <set href="value/text" attributeName="text-buffer" to="00" />
    </use>
    <use id="min-item1" href="#tumbler-item">
      <set href="value/text" attributeName="text-buffer" to="01" />
    </use>
    <use id="min-item2" href="#tumbler-item">
      <set href="value/text" attributeName="text-buffer" to="02" />
    </use>
    <use id="min-item3" href="#tumbler-item">
      <set href="value/text" attributeName="text-buffer" to="03" />
    </use>
    <use id="min-item4" href="#tumbler-item">
      <set href="value/text" attributeName="text-buffer" to="04" />
    </use>
    <use id="min-item5" href="#tumbler-item">
      <set href="value/text" attributeName="text-buffer" to="05" />
    </use>
    <use id="min-item6" href="#tumbler-item">
      <set href="value/text" attributeName="text-buffer" to="06" />
    </use>
    <use id="min-item7" href="#tumbler-item">
      <set href="value/text" attributeName="text-buffer" to="07" />
    </use>
    <use id="min-item8" href="#tumbler-item">
      <set href="value/text" attributeName="text-buffer" to="08" />
    </use>
    <use id="min-item9" href="#tumbler-item">
      <set href="value/text" attributeName="text-buffer" to="09" />
    </use>
    <!-- simplified for example -->
    <use id="min-item10" href="#tumbler-item">
      <set href="value/text" attributeName="text-buffer" to="20" />
    </use>
    <use id="min-item11" href="#tumbler-item">
      <set href="value/text" attributeName="text-buffer" to="30" />
    </use>
    <use id="min-item12" href="#tumbler-item">
      <set href="value/text" attributeName="text-buffer" to="40" />
    </use>
    <use id="min-item13" href="#tumbler-item">
      <set href="value/text" attributeName="text-buffer" to="50" />
    </use>
    <use id="min-item14" href="#tumbler-item">
      <set href="value/text" attributeName="text-buffer" to="59" />
    </use>
  </use>

  <use id="units" href="#tumbler-toggle-label" class="unit-box">
    <set href="tumbler-toggle-top" attributeName="text-buffer" to="am"/>
    <set href="tumbler-toggle-bot" attributeName="text-buffer" to="pm"/>
  </use>
</svg>
Include the following CSS in your styles.css file:
.application-fill           { fill: device-orange; }

#tumbler-hour               { x: 24;   y: 120; width: 120; height: 100%; }
#tumbler-mins               { x: 158;  y: 120; width: 120; height: 100%; }
#tumbler-hour #value text   { x: 100%; text-anchor: end;}
.tumbler-colon              { x: 141;  y: -16; width: 12; }

.unit-box                   { x: 100%-60; width: 60;}
Use the following JavaScript in your index.js file to interact with the
cycle view and its items:
import * as document from "document";

let tumblerHour = document.getElementById("tumbler-hour");
let tumblerMins = document.getElementById("tumbler-mins");

let units = document.getElementById("units");
let AM = units.getElementById("tumbler-toggle-top");
let PM = units.getElementById("tumbler-toggle-bot");

unitToggle("AM");

function unitToggle(unit) {
  if (unit === "AM") {
    AM.style.fillOpacity = 1;
    PM.style.fillOpacity = 0.3;
  } else {
    AM.style.fillOpacity = 0.3;
    PM.style.fillOpacity = 1;
  }
}

tumblerHour.addEventListener("select", (evt) => {
  let selectedIndex = parseInt(tumblerHour.value);
  let selectedItem = tumblerHour.getElementById(`hour-item${selectedIndex}`);
  let selectedValue = selectedItem.getElementById("text").text;
  console.log(`HOUR: index: ${‌selectedIndex} :: value: ${selectedValue}`);

  if (selectedIndex >= 12) {
    unitToggle("PM");
  } else {
    unitToggle("AM");
  }
});

tumblerMins.addEventListener("select", (evt) => {
  let selectedIndex = tumblerMins.value;
  let selectedItem = tumblerMins.getElementById(`min-item${selectedIndex}`);
  let selectedValue = selectedItem.getElementById("text").text;
  console.log(`MINS: index: ${selectedIndex} :: value: ${selectedValue}`);
});


