Publishing Guide
Overview
In this guide we demonstrate how developers can publish their apps and clock faces to the Fitbit App Gallery.
When a developer creates an app or clock face using our Command Line Interface, they are able to install and test it using the device simulator or their own Fitbit device. In order to share their creations with their friends, colleagues or the larger Fitbit community, they must publish them into the Fitbit App Gallery.

The Gallery App Manager (GAM) is the tool used by developers to upload, manage and publish their apps (applications and clock faces) within the Fitbit App Gallery.
This guide will explain the core concepts, walk you through the app gallery publishing process, and help you avoid some of the common pitfalls.
Prerequisites
Before you begin, you'll need a Fitbit user account as well as a Fitbit OS app to publish. If you haven't created one yet, you should follow our Getting Started guide and build something awesome.
You can test your app using our device simulator, but before considering publishing you should also test it using a real device.
Note: Due to security requirements, you must have a Fitbit OS device associated with your Fitbit user account in order to publish apps to the gallery.
Compatible Devices
You cannot publish a single build that targets Fitbit OS 5 and Fitbit OS 4, but you can publish different builds targeting each version in a single GAM listing.
- Fitbit OS 5 Devices: Fitbit Versa 3, Fitbit Sense
- Fitbit OS 4 Devices: Fitbit Versa, Versa Lite, Versa 2.
includes special editions
Required Resources
To enjoy a smooth publishing process you should prepare the following resources in advance:
Fitbit OS Application
You'll need a compiled version of your completed app project. You'll find the.fbafile within the/buildfolder of your project, after executing thebuildcommand.Screenshots
You must include at least 1 screenshot, and up to a maximum of 5 for each platform your project supports. You can execute thescreenshotcommand and the file will be placed into the root folder of your project.Icon (applications only)
Applications require an icon image in PNG or JPEG format, either 80x80 or 160x160 and should have a transparent background. Clock faces do not require an icon image.
Core Concepts
In order to ease the publishing process, it's important to understand some of the core concepts relating to the Fitbit App Gallery before attempting to publish.
Public vs. Private
Apps (applications and clock faces) can either be published privately, or publicly.
Publicly published apps can be downloaded by anyone browsing the Fitbit App Gallery and clicking the Install button.
Privately published apps are not visible within the Fitbit App Gallery, and can only be installed by clicking on a direct installation hyperlink from a mobile device that has the Fitbit mobile app installed.
By default, all apps are privately published by default. In order to make an app public it must adhere to the App Gallery Guidelines and be submitted for review by Fitbit. If the review is successful, the developer can publish the app publicly. If the review is unsuccessful, the rejection message will contain an explanation of the problems which need to be resolved before the app can be re-submitted for review.
Paid vs. Free
Fitbit does not provide a payment mechanism for apps. If your app is associated with your own subscription service, or if you have an external method of unlocking your app via a payment, you must indicate that the app is "paid".
In order to be fully transparent to users, all paid apps will display the following banner within the Fitbit App Gallery:

It is vital that the app adheres to the App Gallery Guidelines for paid or subscription apps.
Publishing
Step 1: Creating a GAM Listing
Once you've collected the required resources, you will need to create an app listing in the Gallery App Manager.


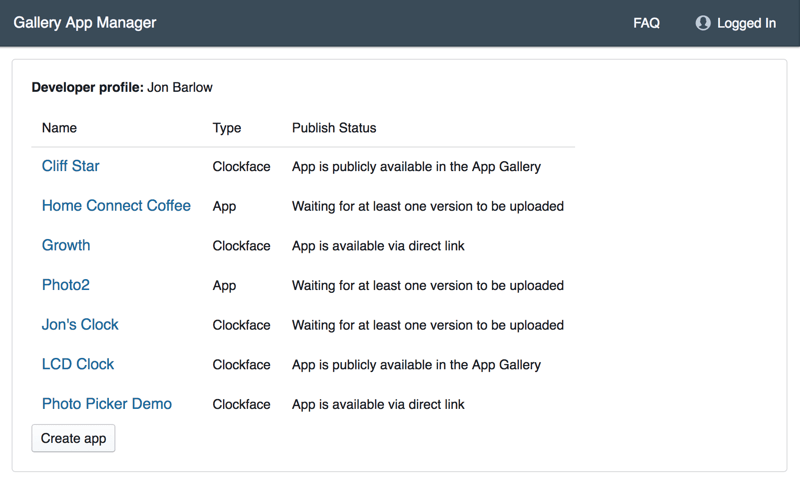
After clicking 'Create', your app will be included in the list of apps and clock faces associated with your developer profile.
Step 2: Project Information
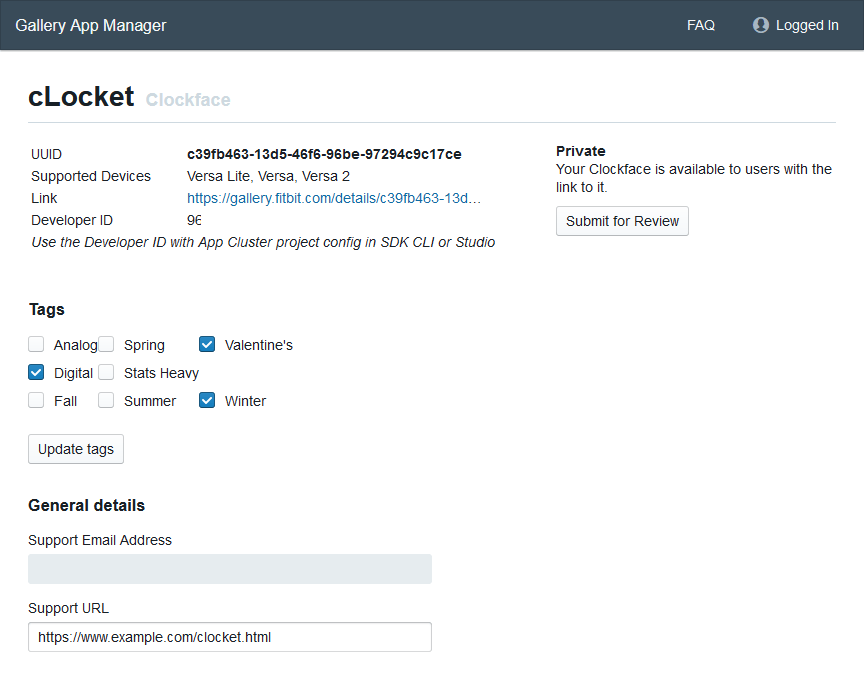
Once you've created an app listing in the GAM, provide the required information about your project.

Tags
It's important to use the correct tags as improper categorization will result in a rejection during the review process. For example:
Analog - the clock's main display should be in the traditional format, either with hour, minute or second hands and a dial, or where the elements move in the same way as an analog clock would.
Digital - the clock's main display should show clearly the hour and minute in digits.
Stats Heavy - the clock's design should heavily feature the core fitness statistics.
Note: Don't forget to press the 'Update tags' button after making changes.
General details
You need to provide a support email address or a website URL that will allow users of your app to get help.
Localized
details
The app name and description can be localized into the following languages:
- English
- French
- Italian
- German
- Spanish
- Dutch
- Swedish
- Japanese
- Korean
- Chinese (Simplified)
- Chinese (Traditional)
The app description can be up to 1000 characters in length, but a shorter
description is easier for users to digest. If you wish to use rich text within
your description, you must paste your text from another application.
Screenshots
After you've uploaded the first build of your app (see next section), you can upload up to five screenshots per supported device. GAM will tell you what the image sizes need to be, but they must exactly match the pixel resolution of the physical devices. Since all watches in the Versa family have the same screen dimensions (in terms of pixels), you can save yourself some time by uploading a set of screenshots for all of these devices in the 'Common' section --- but don't do this if your app displays different things on different models!
Note: Always press 'Save' after changing screenshots to ensure that your information is retained when you leave the page.
Step 3: Uploading a Build

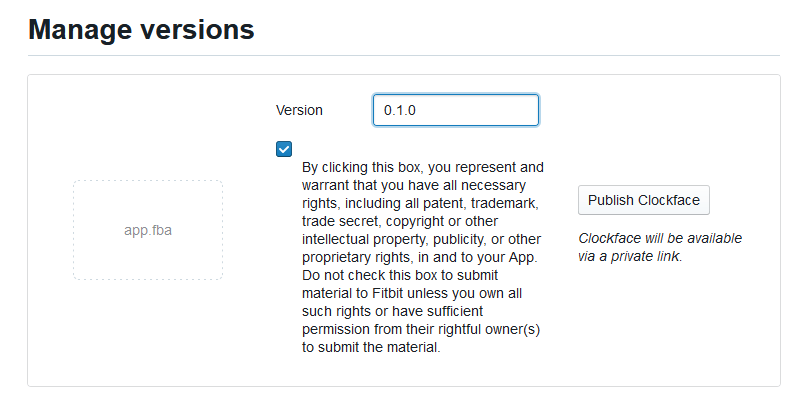
In the Manage versions section of your GAM page, click Upload .fba to select
a build file to be sent to Fitbit's server.
Specify the version number of your build. This version number is useful to understand which version of your app is published in the gallery, or installed by a user.
Before you can upload your build, you need to confirm that your submission satisfies the following legal requirements:
By clicking this box, you represent and warrant that you have all necessary rights, including all patent, trademark, trade secret, copyright or other intellectual property, publicity, or other proprietary rights, in and to your App. Do not check this box to submit material to Fitbit unless you own all such rights or have sufficient permission from their rightful owner(s) to submit the material.
Finally, click Publish Clockface to upload your build to Fitbit's server.
If this was the first time you've uploaded a build for your app, the app won't yet be made publicly available in the Gallery. However, it will be assigned a private link, which is displayed near the top of the GAM page. You can use this link to install your app on physical devices. Feel free to share the link with friends so you can get additional testing and feedback.
After you've uploaded a build, you can add screenshots in the Localized
details section of the GAM page.
You can add additional subsequent builds of your app by following the same process. Don't forget to increment the version number in the app and GAM page when doing so.
Step 4: Submitting for Review
Every version of your app that you wish to make publicly available needs to be
reviewed by Fitbit staff. Click Submit for Review on the app's GAM page to
begin this process.
If the Submit for Review button is disabled, this will be because you haven't
provided all necessary information. Hover your mouse over the button to find
out what's missing.

After clicking Submit for Review you'll be prompted to confirm if your app is
paid or free, and to provide notes for the review team. If your product requires
any explanation beyond its description, put it in here. If you make things as
easy as possible for the review team, your product will be reviewed and approved
more quickly.
If your app requires payment and/or accounts on third-party services, you will need to provide the review team with suitable discount codes and/or test accounts. Without these, they will not be able to fully evaluate your app and your review will be rejected.
You can use the checklist at the end of this article to help you to avoid common publishing pitfalls.
Step 5: The Review Process
Fitbit's review team validates all supplied information and screenshots, and tests the functionality of the submissions using multiple Fitbit devices and the Fitbit Device Simulator.
If your submission is rejected, you will receive an email explaining the problem(s) encountered. After addressing the issues, you can submit a new version of your app for another review.
Step 6: Publishing
If your app is approved, you will receive a notification email. At this point you must login to GAM and publish your app. This will make it visible and installable by all users with compatible devices.
Getting Help
If you're having problems with the publishing process or have any questions, you can get help on our community forums, or over in the community Discord.
We've also provided this handy publishing checklist for download.
This guide was written by the Fitbit Developer MVPs.


